Idea Pins, previously known as Story Pins, are a series of Pins combined to share a story or tutorial with various editing options like color, text styles, music, etc. Whether you are a business owner, fashion blogger, or content creator, these Pins will take your Pinterest engagement to the next level!
What Makes Idea Pins Different from Regular Pins?
Idea Pins are a powerful tool for personal or business accounts on Pinterest to reach new audiences and increase their Pinterest following. It’s a new way to share your ideas.
Pinterest’s algorithm certainly favors Idea Pins compared to regular Pins. Here are some notable features unique to Idea Pins:
- Topic tagging to optimize reach for your brand
- Creative editing tools
- Unlike stories on other social media platforms, Idea Pins will stay on your profile forever once published.
- Analytic stats such as Pin clicks, Saves, Impressions, Profile visits, and Follows to help creators or businesses analyze their content engagement
- Does not offer link attachment
Note: The steps shared in this article are for creating Idea Pins for a business account. You can also check if your personal Pinterest account is eligible for creating Idea Pins.
Create idea pins using the Pinterest App on iPhone or Android
- Sign in to your Pinterest account. Tap on the Plus sign in the toolbar at the bottom of the screen.
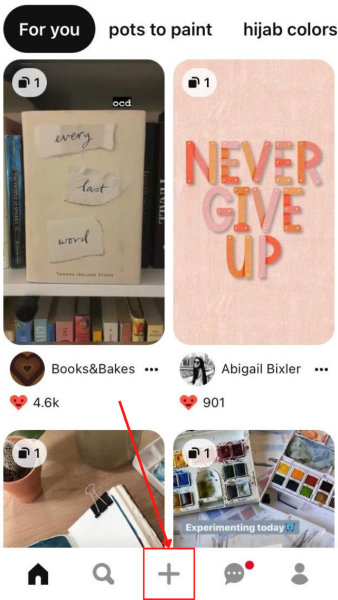
Click on the Plus sign to add new Pins. - Click on Idea Pin in the Create menu to record or upload image/video files.
Note: If you cannot find the Idea Pin option, there is a possibility that Idea Pins are not available for your account. You can convert your personal account to a business account or wait for the Idea Pins to be rolled out in your country.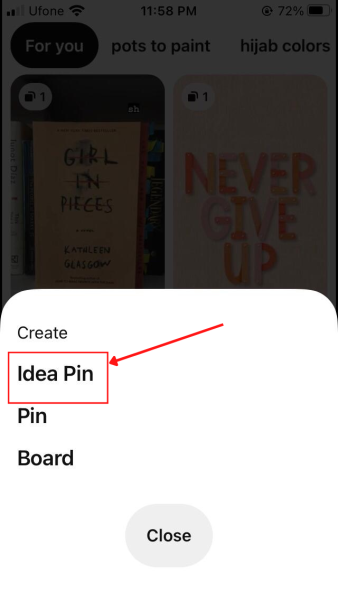
Tap on Idea Pin in the Create menu - Tap on the red circle or recording icon at the bottom of the screen to record a new video using your phone. You can also access Your drafts by clicking on the folder icon in the bottom right of the recording screen. The image icon in the bottom left corner allows you to use files from your phone.You can select the recording speed, timer, video limit, flash, and flip camera (front/back) using the options on the right side of the recording screen.Note: the timer allows you to set a timer for 10 or 3 seconds and record videos without using the recording button.
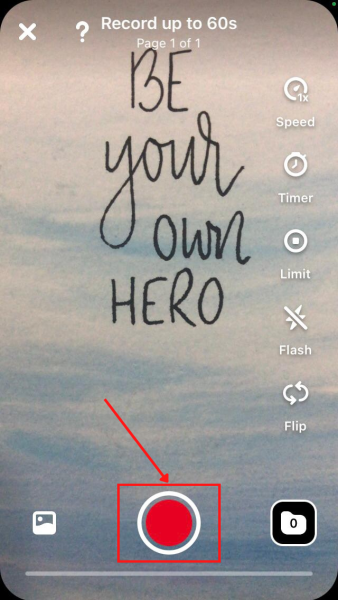
Click on the Red Button to start recording videos for Idea Pins - Once you have recorded multiple videos to compile your Idea Pin, tap on Next in the top right corner of the mobile screen.
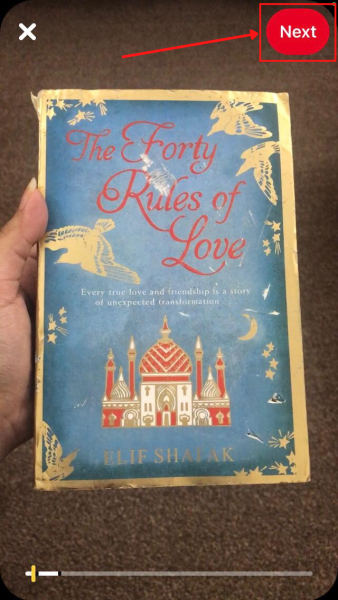
Click on Next to edit the videos. - Now comes the fun part! Pinterest gives many options to edit your Idea Pins in the mobile app. These options, found at the bottom of the screen, allow you to trim, rearrange the clip, add recorded audio, or select from the music offered by Pinterest.You can enhance your design using text, stickers, filters, and drawing tools. Creators can also add a product link or tag another account. Click on Done in the top right corner once you have finished editing the clip.
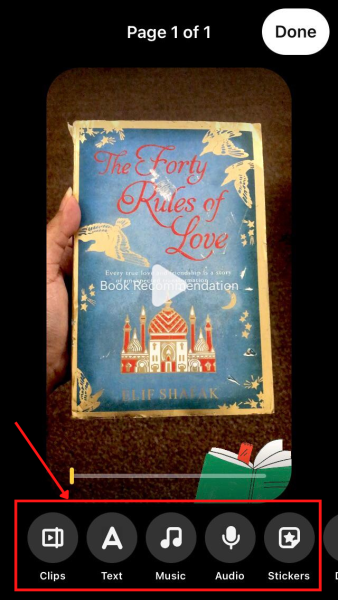
Edit the video or images using the options at the bottom - To add a new page, click on the plus sign in the bottom right corner of the screen. Alternatively, swipe left and tap on the page with a large plus sign in the middle. You can also duplicate or split pages.
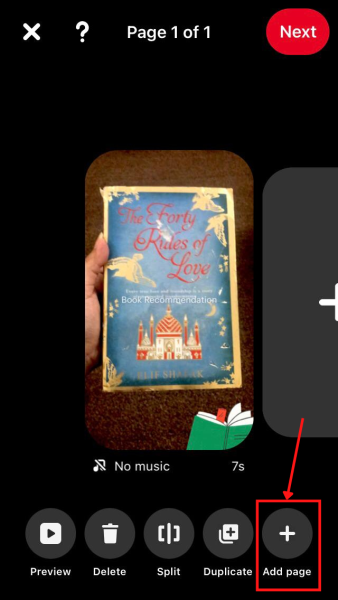
Tap on the Plus sign to add more pages - To use videos and images from your device, click on the image box in the bottom left corner of the recording screen. Idea Pins have an aspect ratio of 9:16, so choose images/videos accordingly to avoid unnecessary cropping.

Tap on the Image icon to open the gallery - Tap on the files to add them to Idea Pin. The selected files will start showing at the bottom of the screen. You can select up to 20 files and click on Next. Each image or video file will appear as a separate page.
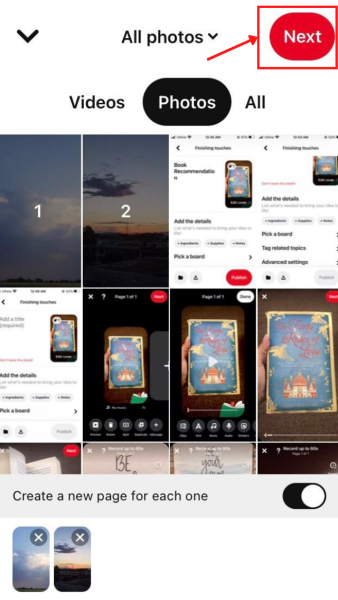
Select images or videos from the phone gallery - Scroll and tap on the pages to edit them. Page order can be rearranged by clicking the Reorder button in the bottom toolbar.Note: if you added a video, it’s best to keep it on the first page.

Reorder, Duplicate or Split pages - Click on Preview to get an idea of how your viewers will see the pages.
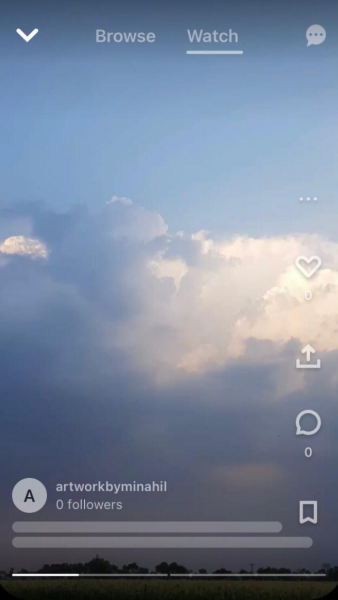
Preview of the Idea Pin - Click on Next to complete the final touches.
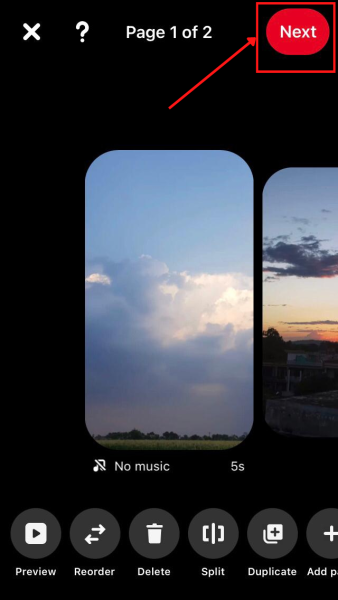
Click on Next to perform the Final touches. - Before publishing, Add a title for your Idea Pin. This is a crucial step to help the Pinterest algorithm understand the nature of your content. You can add additional details like supplies, ingredients, or notes using the Add the details tab.You can edit the cover page for videos by clicking Edit cover on the Pin image on the right side of the title.

Add a title for the Idea Pin. - To organize your Pins, you can Pick a board for the Idea Pin before publishing it. Adding tags and Allowing comments under Advanced settings is optional, but will typically boost engagement on your Pins.
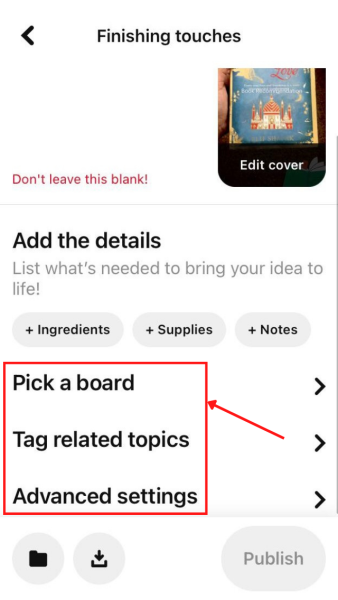
Select a Board for the Idea Pin and Add tags - Before publishing, you can download your Idea Pin using the download button icon in the bottom left corner. Tap on the folder icon to save the Idea Pin to Your drafts.
Finally, tap on Publish to share the Idea Pin with your audience.
Publish or download the final version of the Idea Pin - Published Idea Pins will appear in the Created tab on your profile.

Published Idea Pins in the Created tab
Create Idea Pins Using Pinterest on Computer
- Start by logging in to your Pinterest business account on Pinterest.com.

Log in to your Pinterest account on the website. - Click on Create in the top menu bar of the Pinterest homepage. This will give you further options to choose Create Idea Pin.

Click on Create Idea Pin under the Create menu. - Select Create new to add a new Idea Pin.
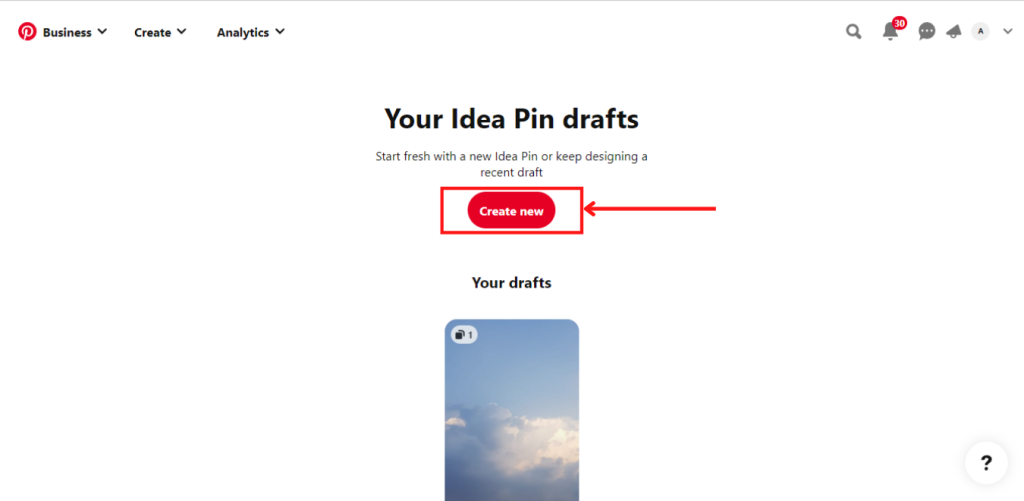
Click on Create new to start a new Idea Pin. - Click on the upload icon in the next window to upload new files. Multiple file video or image files can be selected. You can also drag and drop the files.

Click on the screen to upload images or videos from your computer - A single Idea Pin story can have a maximum of 20 pages. To upload more pages, click on the plus sign in the left portion of the design page. Alternatively, you can also select Add page.

Add a new page or Delete and Duplicate the previous pages - Now you can start designing the pages. The image you imported appears in the middle of the page. The left side can delete, duplicate or add more pages. The right side has options to adjust the image height or add text and background.In the Image tab, you can move the image up and down to resize and focus on a specific part of the image. You also can flip your image vertically or horizontally using the arrow-like icons at the bottom.

Flip the page horizontally or vertically. - In the Text tab, you can Add text to your image. A small text block will appear on the page. Tap on the text block and type your text.
Note: you can add up to 250 characters in the text box.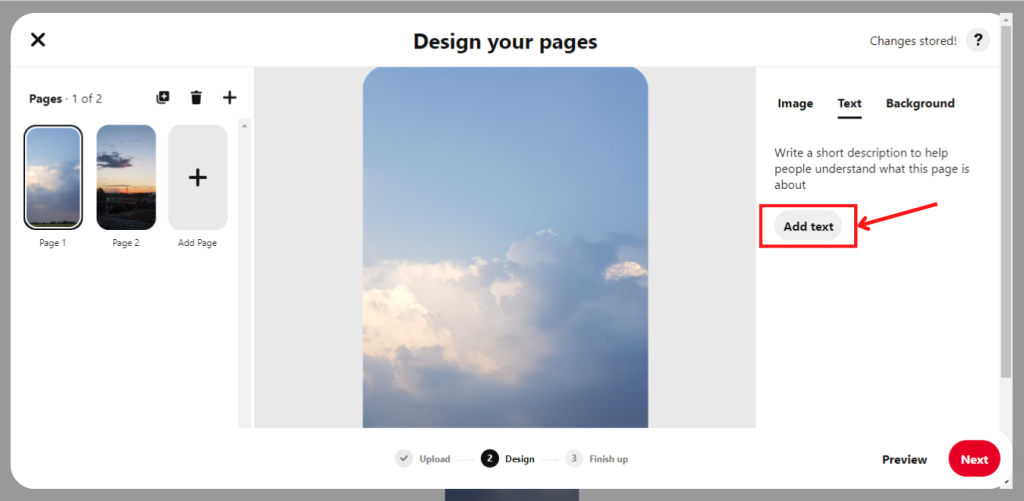
Tap on Add text to introduce a text block on the page - In the text editing screen, you can change your text’s font, size, alignment, color, and highlights.

Change the Font style, size, alignment, and color. - Once you are happy with the design, click on Preview in the bottom right corner of the screen and review each page before publishing.

Preview the Idea Pin pages before publishing - Click Next to add final details to your Idea Pins.
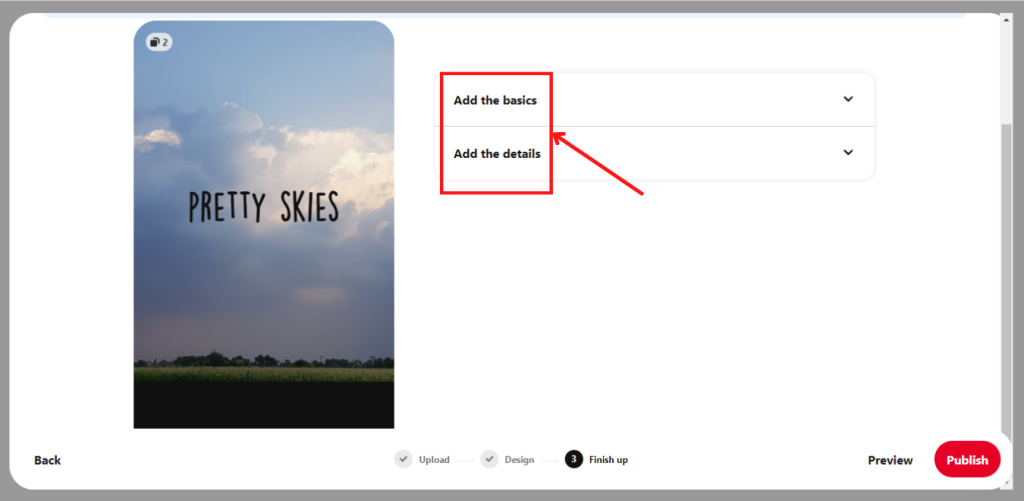 Finishing up options in the Idea Pin Builder
 - Under Add the basics, you can add a title and tags and select a board to which you want to share the Idea Pin. You can also turn on the Allow people to comment toggle.
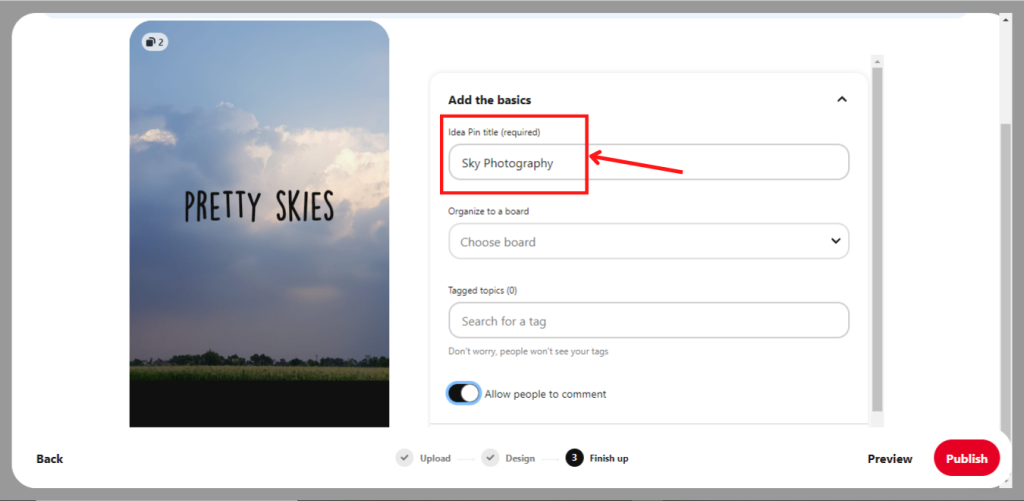
Add a title for your Idea Pin. - In Add the details, you can add Ingredients, Supplies, or Notes to your idea pin. Tap on Publish in the bottom right corner of the screen to upload your Idea Pin.
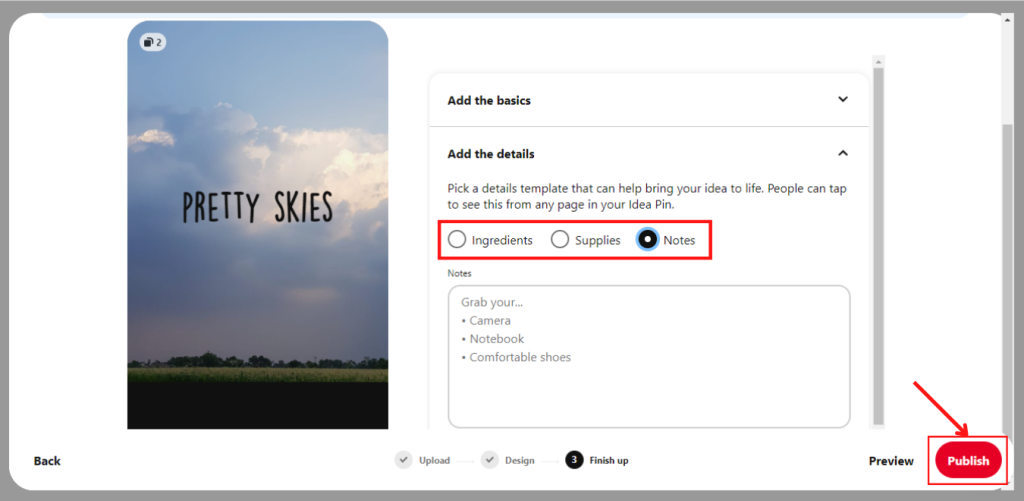
Click on Publish to share the Idea Pin.
I’m Susan, the founder of Learn Social Media. As a caregiver I regularly work with vulnerable groups, such as with the elderly in nursing homes, and children with disabilities in schools. During my work, I noticed these groups struggle to keep up with new technologies.
When it comes to social media, this often led to feelings of isolation and “being left out”. The thrill I experienced creating TikTok dance videos with children with disabilities, or helping elderly folks reconnect with old friends and loved ones on Facebook, is what inspired me to launch this project.
Read more about my project here: About Learn Social Media. Feel free to contact me at any time at [email protected], I spend my evenings responding to ALL messages!